Question: I cannot seat my bullets deep enough in my cases to achieve my desired C.O.A.L. using my Competition Seating Die. What am I doing wrong?
Answer: Due to the complex nature of a Redding Competition Seating Die, additional care should be taken as to be certain that the Die is set up correctly. Please see our “Quick Start Guide” for easy to follow instructions.
Typically, problems achieving the correct C.O.A.L. with a Competition Seating Die are caused by one of the following problems:
1) The large Reamed Sleeve (marked with Cartridge Designation) is not being compressed against the shellholder.
The sleeve should be compressed (NEARLY flush with the outer Die Body) when the Ram/Shellholder is raised to its uppermost position. Please note that the when the sleeve is completely compressed, the Die Body itself will need to be backed away slightly as to not contact the shellholder or damage may result. For more information, please refer to the Competition Seating Die Instructions or the Quick Start Guide.
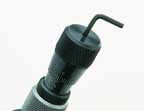
2) The Set Screw located in the Micrometer Top needs to be adjusted.

The Set Screw mentioned above can be adjusted using the large Allen Wrench that was included with your Competition Seating Die.
Turning the screw Clockwise will lower the screw; allowing the bullet to be seated deeper with the same relative micrometer setting. Conversely, turning the screw counter-clockwise will raise the position of the screw producing a longer C.O.A.L. with the same relative Micrometer setting.
If the C.O.A.L. of your cartridges cannot be adjusted deep enough, try lowering the position of the setscrew. When the setscrew is adjusted, the Die will have to be adjusted from “scratch” in your press as to avoid damage. For more information, please reference the section entitled “Micrometer Adjustment and Zero” in the Competition Seating Die instructions and the Quick Start Guide.
*From the factory, a small amount of adhesive has been applied to the setscrew. As a result, the screw’s initial adjustment will require more force than subsequent adjustments.
Specializied VLD bullet seat stems are available
Click here for a reference chart
There have been some concerned comments on chat boards as well as customer comment sections regarding an un-based fear that the Steel Set Screw in a Redding Lock ring can damage the threads of the die.
Please be advised, that in all Redding dies shipped from the factory the lock ring has a piece of Bismuth captured behind the set screw which engages the die threads as the set screw is turned in. This is more costly but far more effective than a simple brass screw, which can be easily stripped and therefore made unusable. Redding uses steel on steel for strength but places a piece of lead between the set screw and the die threads as a buffer to protect the threads from damage and provide a secure lock-up.
If you have further questions, please feel free to contact our tech line (607) 753-3331
As a part of their final processing, Redding dies are cleaned with an ultrasonic cleaner to remove any foreign material which may remain from the manufacturing process. This is the same procedure used to super-clean aerospace parts, hydraulic valve bodies, and the like.
Case scratching problems can usually be traced to the reloading area and some of the equipment that may be in or near it. A few guidelines that will help are listed below:
- Keep the abrasive dust and particles from spent primers cleaned up and away from all equipment.
- If you have a small bench grinder, it should be kept away from the reloading bench, preferably in another room.
- Loading on the range, especially in windy or dusty conditions, can introduce cleanliness problems that can be hard to manage.
- Case tumblers are another potential source of problems. While the cases may come out shiny, they will actually have a thin film of abrasive residue on them. Cases should be thoroughly cleaned and/or washed before going into the dies.
- Nickel plated cases are often associated with die scratching problems. Small particles of the hard nickel plating may be present from trimming and/or deburring operations and can find their way inside the dies.
- It is important to understand that foreign material does not have to be hard to cause problems. Brass chips from trimming and deburring can find their way inside the resizing die, where they can literally be welded to the inside of the die under the extreme pressures generated by full-length resizing. When this happens, the "brass against brass" action will gall the cases, leaving an apparent scratch. The condition will rapidly worsen as brass continues to build up.
Cleaning Your Dies
We are often asked, "How should I clean my dies?" The answer is to use the same procedures, with the same equipment and solvents, that you use to clean the bore of your rifle or handgun. Use the same diligence and effort as well, since the brushing and copper solvents will work well on any brass deposits that may have accumulated inside the die.
Another question that comes up is, "Can I do any internal polishing?" Again, the answer is, "Yes, with care!" The best arrangement is to chuck the die in a lathe, after stripping it down and removing the internal parts. Use #400 or #600 wet/dry auto body paper wrapped around a small wooden dowel. Keep the paper wet with a thin petroleum product with the consistency of WD-40 or kerosene. Using this method, you will easily be able to remove any foreign material or brass build-up from the inside of the die.
Since our dies are heat-treated to approximately 62 Rockwell C, you can polish for a long time without changing the internal dimensions. Do not use ordinary sandpaper or anything coarser than #400, as you will scratch the interior of the die surface and void the lifetime warranty.
It is very important to give the dies a thorough cleaning, after the polishing operation. They should be thoroughly washed, flushed, and wiped several times. Again, just as when cleaning your rifle, check the dies for cleanliness with several wet patches and then lube and dry patch them.
In summary, the name of the game when it comes to avoiding scratched cases is cleanliness! A little attention paid to keeping your reloading area clean, and periodically cleaning your dies, will insure that they give you years of trouble-free service.
If you have further questions, please feel free to contact our tech line (607) 753-3331
When shipped from the factory, all Redding reloading dies are protected with a moisture displacing oil for shipment and storage. During prolonged storage, this shipping oil may migrate to one side of the die and harden. Before using your new dies, they should be cleaned to remove all traces of the shipping oil. Using a quality bore solvent and a brass bristle brush, scrub the interior of the dies out and then carefully dry them. Be sure no solvent remains in the threaded area at the top of the die that may later run down and cause sizing difficulties. An air compressor will greatly assist in drying the dies after cleaning.
A common and obvious cause of shoulder denting is the application of excessive lubricant before the case is run into the sizing die. When using a high-grade case lubricant, such as our "Imperial Sizing Die Wax" or "Original Formula", a light, even coat applied to the body of the cartridge case is all that is necessary. The lubricant can be applied using your fingers or our lubricant pad. Be sure to wipe the excess lubricant off the case shoulder and neck area, leaving only a thin film remaining.
Lubricant can also build up over time in the sizing die body. Each time the die is used, a new layer of lubricant is added. The lubricant then hardens during storage and gradually builds up until the accumulation starts denting the cartridge cases. Clean the die using the above recommended procedure to restore the interior of the die.
Another common cause of cartridge case denting is excessively sizing the case. In this case, the "dent" is actually a "kink." When the sizing die dimensions aren't closely matched to the chamber dimensions, the case buckles away from the die during sizing. This can be caused by an oversize chamber, an undersize die, excessively bumping the case shoulder or any combination of the three.
A properly adjusted full length sizing or body die should be set up to bump the case shoulder 0.002" for most rifles. When sizing cases for an autoloader, bump the shoulder .004" to .006". This figure can be verified with the Redding Instant Indicator Headspace and Bullet Comparator. Using a Redding's Competition Shellholder Set will make achieving precise shoulder bump a snap. See the Redding catalog or website for more information.
To check for excessive case sizing, compare the dimensions of a fired case and one that has been resized. The diameter of the fired case at any point should not be reduced more than 0.005". If you find that your cases are being sized more than this, an oversize chamber or undersize die may be the problem. Sometimes, it may be possible to polish or hone the die to better match the chamber. Check with the factory if you suspect this problem.
A popular misconception is that sizing dies need a "vent hole" to release air or excessive lubricant. It can be easily demonstrated that a vented die will also dent cases if excessive lubricant is applied to the cases, case dimensions are not compatible with the sizing die or the case shoulder is being bumped excessively.
If you have further questions, please feel free to contact our tech line Phone (607) 753-3331


